nvk_CREATE
Introduction
- Authors : Nick von Kaenel, Neutronic
- Email : support@nvk.tools
- License : EULA
- ReaPack Repository : https://reapleton.com/index.xml
First of all, thank you so much for your support. You are awesome! I hope you enjoy this product and make some amazing sounds with it :)
With your purchase of a license, you are entitled to free updates + exceptional support from me directly. This user guide should help with the most common issues, so please look for help here before emailing me. I will also create video tutorials if you prefer to learn that way.
Your license key is for your own personal use and may be used for commercial or non-commercial work. If you share your license key with anyone else, it will be revoked and you will not get a refund.
For a site license, just purchase as many copies as you need and activations will be added to the same license key.
Installation
ReaPack
In order to install this script you will need to first install ReaPack. It's an amazing way for people to easily share REAPER scripts with other users and will allow for this script and all other scripts to be easily updated from within REAPER. For more info on how to use ReaPack go here.
ReaPack Repository: https://reapleton.com/index.xml
- With ReaPack installed, select Extensions-ReaPack-Import repositories and paste the ReaPack Repository url above.
- Locate the scripts to install by selecting Extensions-ReaPack-Browse packages and searching 'nvk'. Then you can select the scripts and install them with Actions-Install and then Apply
- After you finish downloading the scripts, you can find them in your actions list by searching 'nvk'
Note: If you would like to automatically stay up to date with this and other ReaPack Repositories, you can select Extensions-ReaPack-Import repositories and then Options-Install new packages when synchronizing. Then, when you select Extensions-ReaPack->Synchronize packages it will automatically install all new scripts.
js_ReaScript API
You will need to install this in order to use certain features of the scripts. This is available by default in ReaPack and can be found by searching "js_ReaScript API" in ReaPack if you have the ReaTeam Extensions Repository (https://github.com/ReaTeam/Extensions/raw/master/index.xml) enabled
SWS/S&M Extension
Download SWS/S&M Extension and follow the instructions to install
Activating the License Key
Once you have the script installed, load your actions list and search "nvk" to locate the script. Double-click it or assign it to a hotkey and run the script. You will be prompted to input your license key, which you should have recieved immediately after purchasing the script.
This script is only guaranteed to work on the latest version of REAPER and SWS/S&M 64-bit. 32-bit is not supported. Make sure you are up to date before contacting support.
Media Explorer
In order to use nvk_CREATE, you will need to create Media Explorer databases. For more information on how to use Media Explorer, check out these videos.
How To Create Media Explorer Databases
- Open Media Explorer (View->Media Explorer)
- Right-click in the side panel to "Create new database..."
- With your database created, right-click again on the database to add the path(s) containing your files
- After Reaper finishes scanning the files, re-open nvk_CREATE
Soundminer
You can also search Soundminer databases with nvk_CREATE. In order to use this feature, you will need the latest version of Soundminer and the Soundminer Reaper plug-in.
How To Search Soundminer Databases
- Make sure Soundminer is open and running and you have the preference "RUN INTERNAL HTTP SERVER" checked in your preferences.
- Select the Soundminer database option from the "Select Media Databases" screen in nvk_CREATE
- With the search blank, the results list will show the currently filtered results in Soundminer
- Type in your search as you would in Soundminer in nvk_CREATE
Soundminer-specific Preferences in nvk_CREATE
Disable auto-search : instead of displaying search results instantly with each letter you type, the script will wait until you press enter to do a search. This can help when searching larger Soundminer databases due to the large amount of results returned.Resolve Soundminer file paths : if you encounter issues with files not appearing when searching Soundminer databases, enable this feature to fully resolve the file paths and account for moved drives or files on servers.
Basics
About
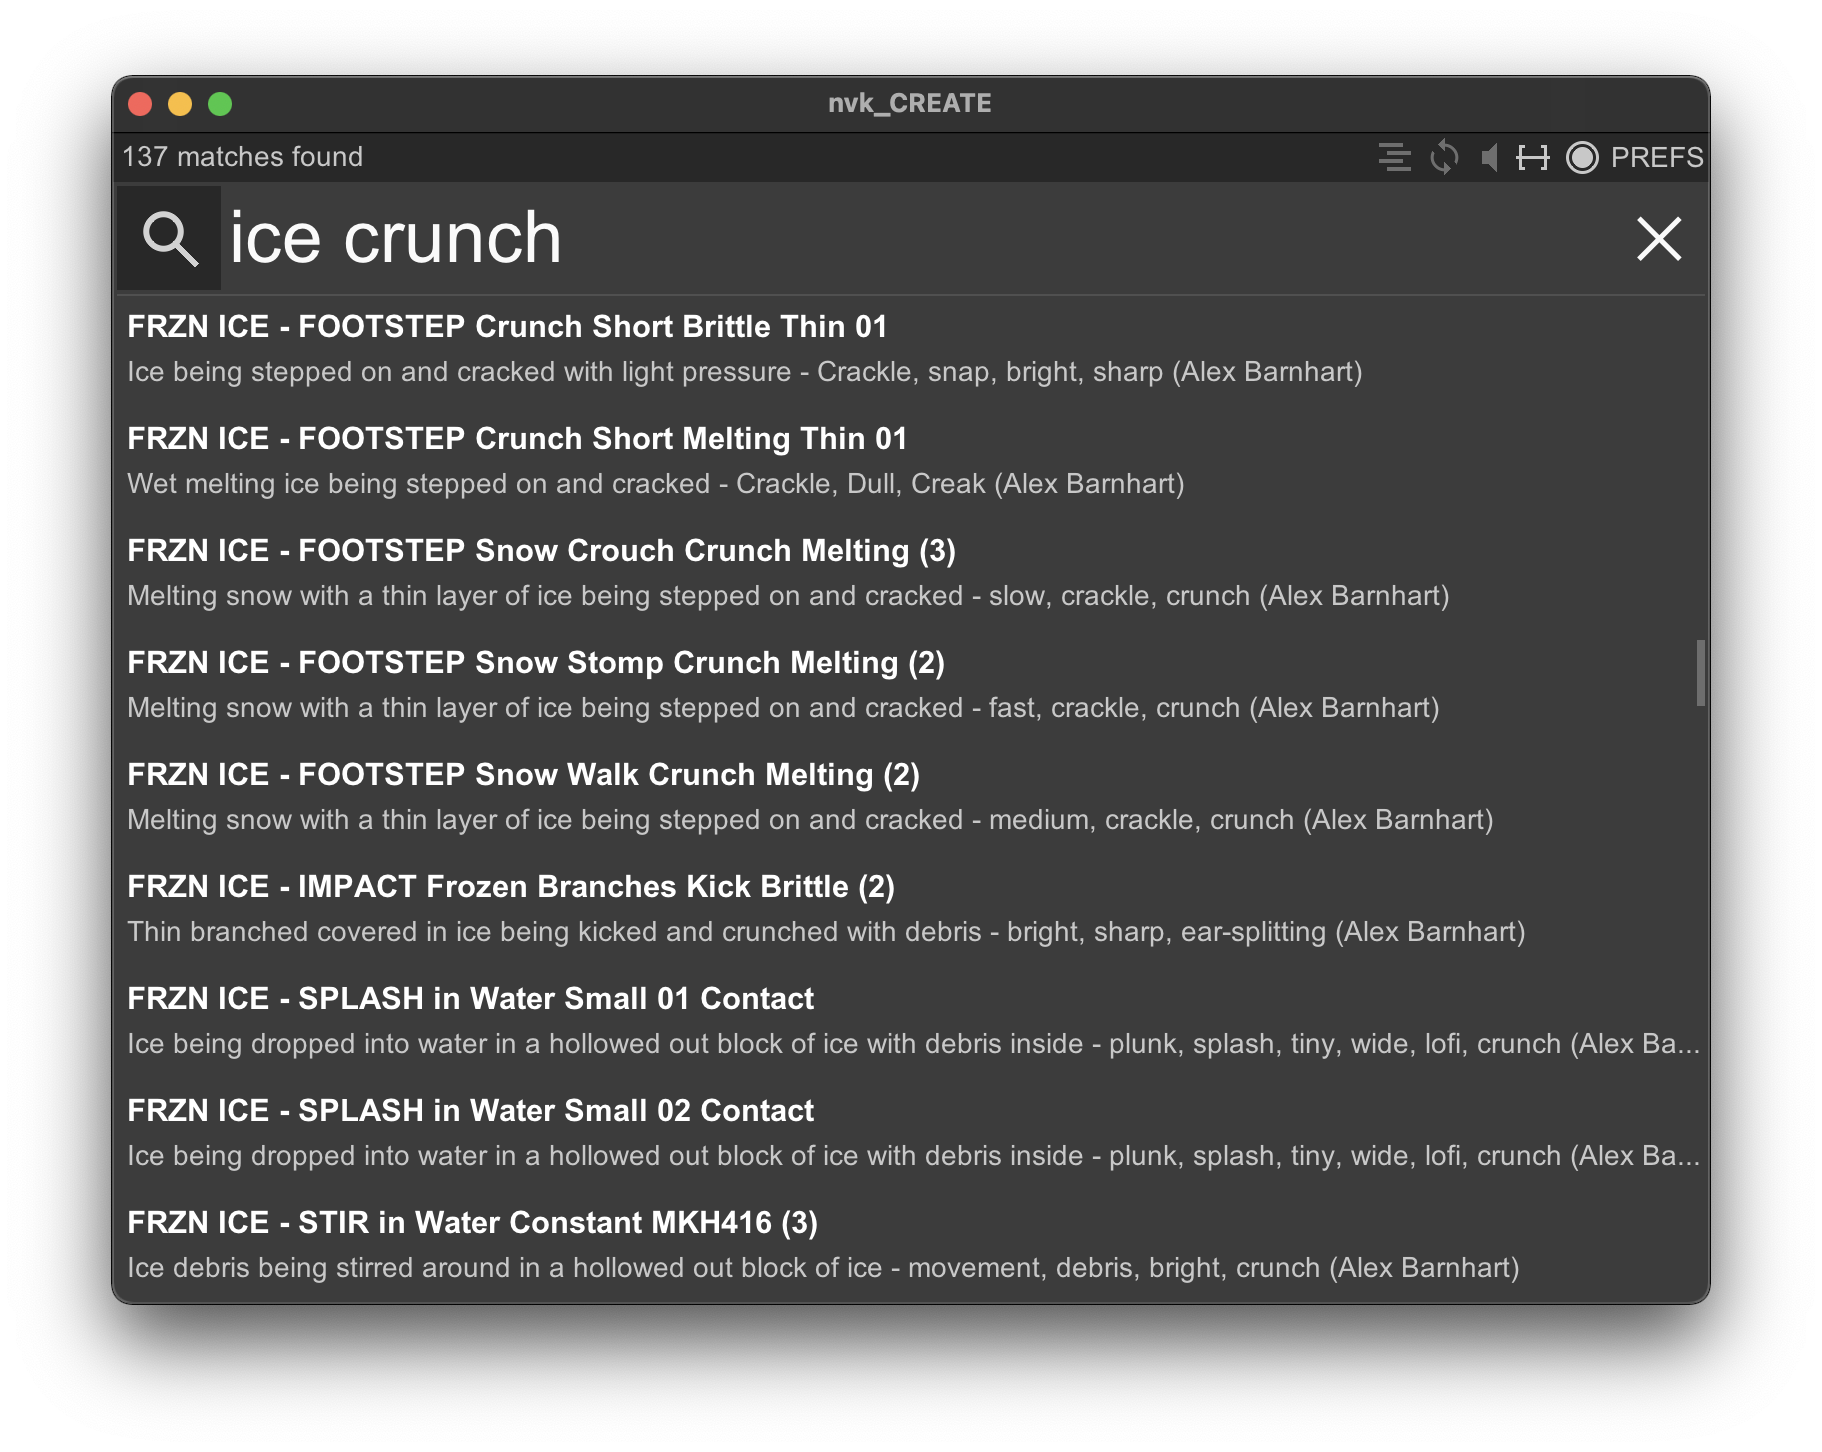
nvk_CREATE is a script for REAPER which allows you to quickly search through your Media Explorer databases for sounds. It adds additional features such as automatic trimming, take numbering, and add file variations as takes. It is designed to be quick to open, light on memory, and simple to use. It is not meant to be a fully-featured search program, but rather a quick and easy way to try out new ideas and get sounds into your project trimmed and ready to go.
The multi-layer mode is where things start to get interesting. When in this mode (which you can access with TAB), pressing ENTER will automatically create layered sounds based on your settings and search string. This ends up being an extremely powerful workflow for generating new and interesting content. Unlike other alternatives, the tight integration with REAPER means you don't have to render anything until you are ready. You also have additional control over things such as the length of the the takes and the ability to add any of your vst plug-ins to the tracks for more interesting designs. There's even more, but that's why we have this guide!
How To Use
- Open the script. If it is the first time, you will be prompted to enter your activation code and then select the Media Explorer databases you would like to search
- Type in your search string to find the file of your choice.
- Find the file you want with your mouse or arrow keys. Once you have your file/files selected, you can either drag them to insert them into your project or press the enter key to insert them at the edit cursor
Multi-layer Mode (TAB)
To activate multi-layer mode, hit the TAB key while in the search window. This will make the multi-layer settings visible. While in this mode, pressing ENTER will execute the multi-layer action based on your search string and the multi-layer settings
Advanced
Boolean Search
OR, NOT, and "" can be used for more control over the search results (e.g. "wild horse" OR mustang NOT vehicle). You can also subsitute commas for OR, and hyphens for NOT (e.g. "wild horse",mustang -vehicle)
Token Search
There are also special searches you can do for information about the files. Adding a letter from the list below after a number value will search for files that match that value. Adding "+" after the letter searches for anything equal or above the number and adding "-" finds anything equal or below the number. "=" after the letter will return exact matches, otherwise it will return matches that are considered close
Bit rate (b) : 32b, 16b+, 24b-
Channels (ch) : 1ch, 6ch+, 2ch-
Sample rate in kHz (k) : 192k, 48k+, 22k-
Note: sample rates such as 44100 or 22050 are rounded down
and can be searched with 44k and 22k respectively
File length in seconds (s) : 5s, 1s+, 10s-,
40s=, 0.5s-
Take length in seconds (t) : 5t, 1t+, 10t-,
0.5t-
Note: in order to search for take length you will need to
build your file cache. You can do this by pressing F5 and
letting the script run overnight. Take length is an average of
the various take lengths in the file and exact matches are
unlikely.
Controls
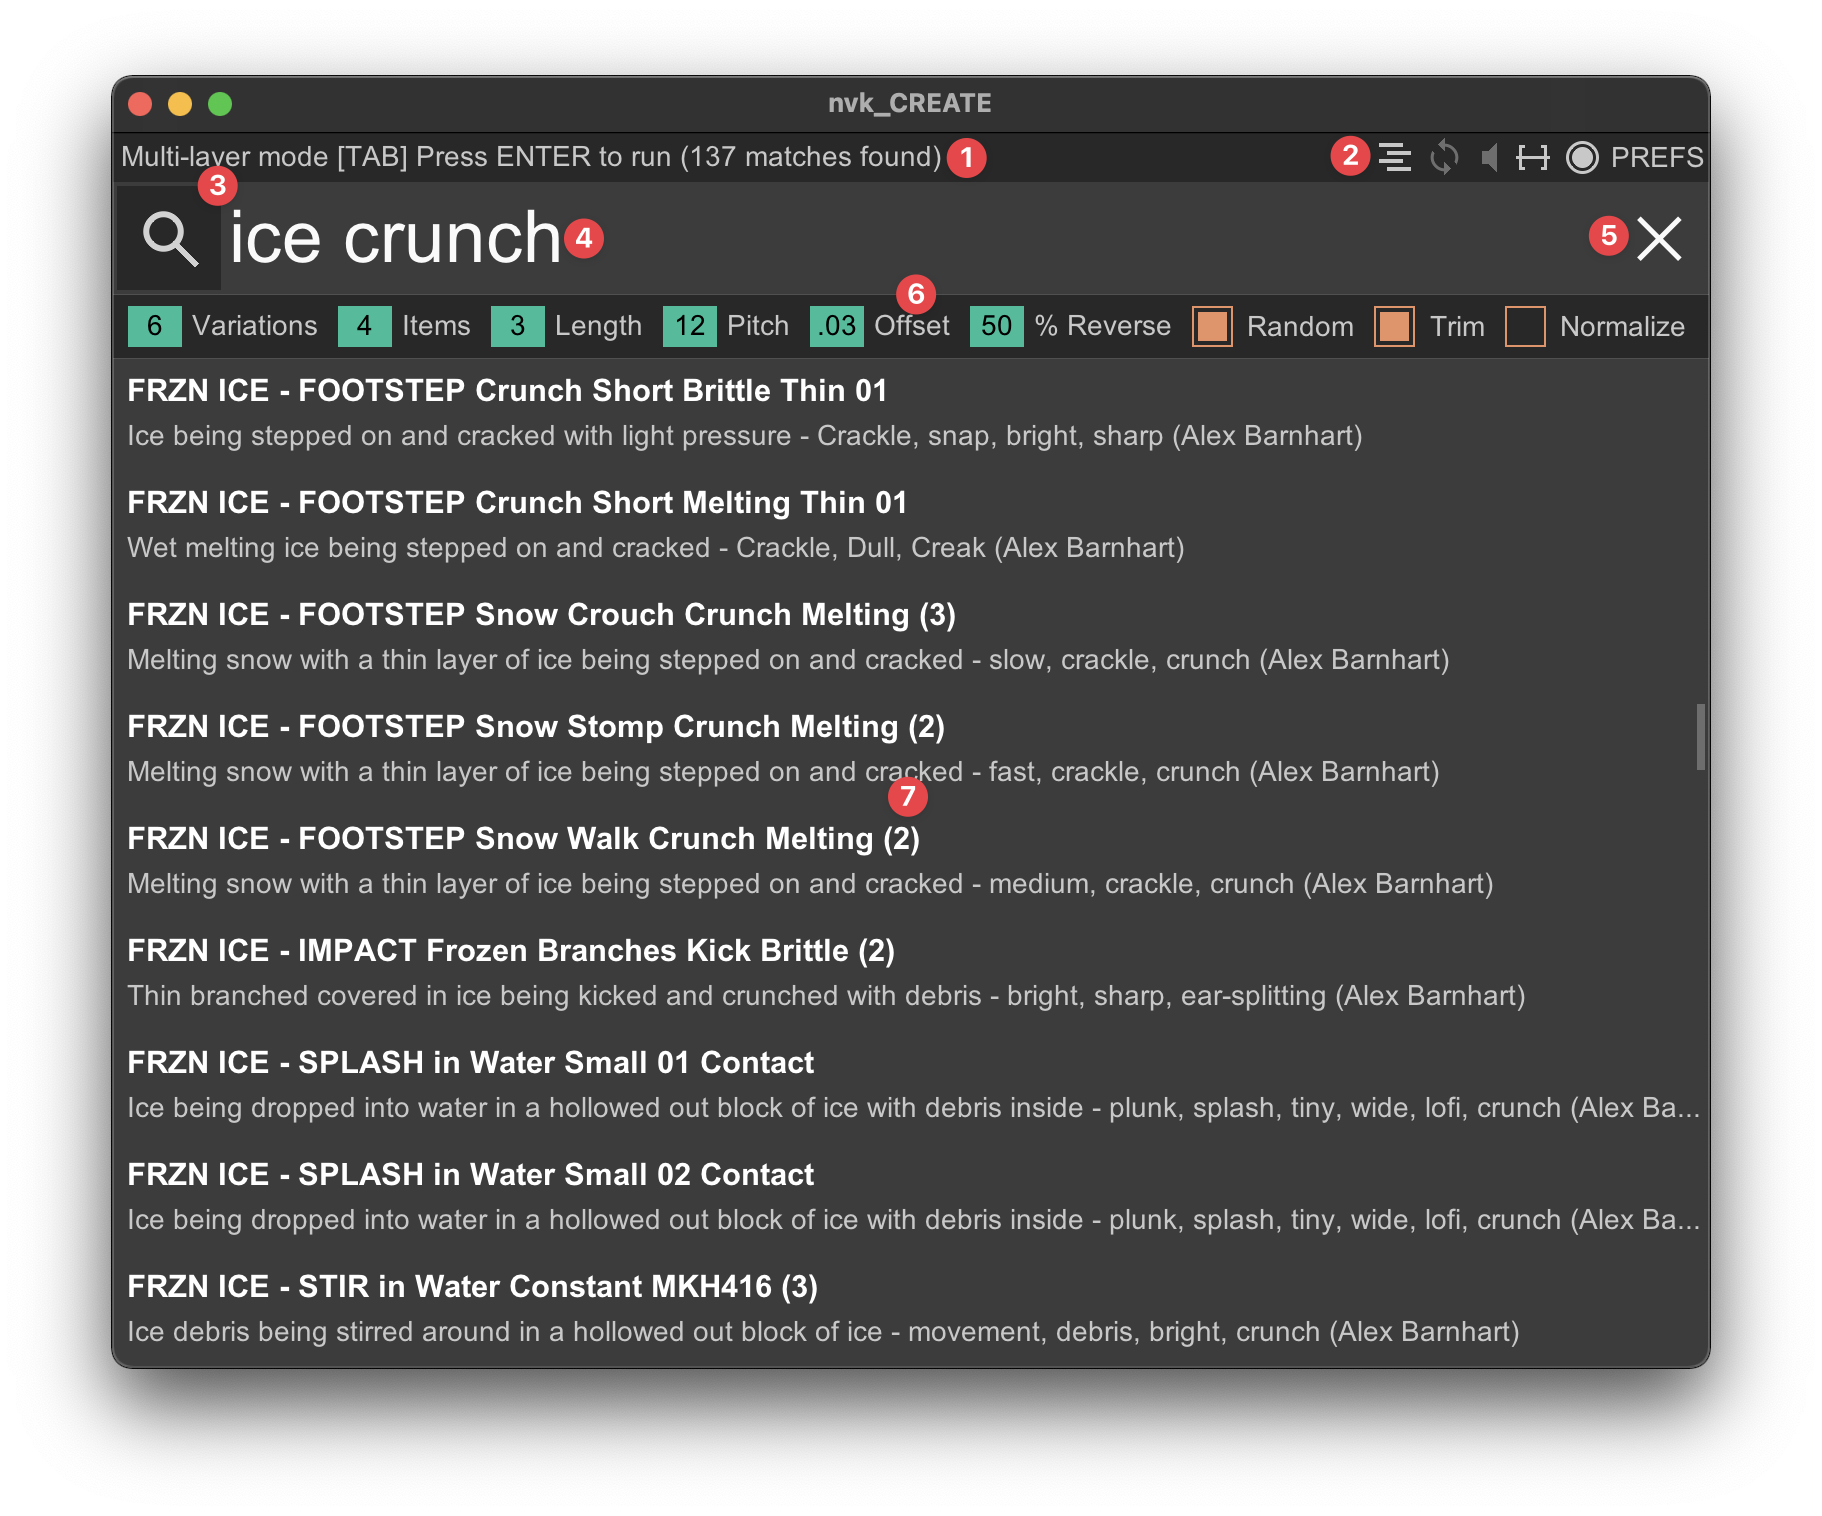
1. Information
Hover over a control to find out more information, or right click here to dock/undock the script
2. Settings
3. Click to select media databases
Clicking the magnifying glass will open up the media database browser where you can select the database(s) you want to search (Ctrl+Click to select multiple). You will need to create these media databases in REAPER's Media Explorer before using the script.
4. Search Text/Waveform View
Anything you type will show up here, no need to click in the box. Type in your search string to find the file of your choice. OR, NOT, and "" can be used for more control over the search results (e.g. "wild horse" OR mustang NOT vehicle). If a file is playing and you have waveform display enabled (in preferences) then you can click here to seek to a specific time during playback or click-drag in order to bring a specific take of the file into the project.
5. Clear Search Query
6. Multi-layer Settings
7. Results List
Click or use the arrow keys to select results. Shift+Space to start/stop playback. When you have found a file you want to add to the project, either press Enter or drag it into the arrange window.
Keyboard Shortcuts
On Mac, Ctrl = Cmd and Alt = Option
F1 : open the help file
F2 : toggle preferences/search view
F3 : select media databases
F4 : hide/unhide search results
F5 : start/stop file analysis
F6 : remove missing files from file analysis
cache
F7 : decrease the maximum results number
F8 : increase the maximum results number
Shift+F7 : toggle compact results lists
Shift+F8 : toggle combined results
F9 : make GUI smaller
F10 : make GUI larger
F11 : previous theme color
F12 : next theme color
Shift+F11 : previous waveform color
Shift+F12 : next waveform color
Ctrl+F11 : previous highlight color
Ctrl+F12 : next highlight color
Ctrl+Shift+F11 : previous waveform/highlight
color
Ctrl+Shift+F12 : next waveform/highlight
color
ESC : clear the search box or close
nvk_CREATE
TAB : toggle multi-layer mode
~ : toggle keep script open
; : toggle auto-trim items
\ : toggle track preview
? : shuffle results
Up/Down : select previous/next result
PageUp/PageDown : select previous/next page of
results
Left/Right : seek forward/backward through
preview regions
Shift+Left/Right : seek forward/backward
through preview by 1 second
Ctrl+Left/Right : seek forward/backward to
beginning or end of sound
Ctrl+Up/Down or Ctrl+Mousewheel :
increase/decrease playback volume 1 db
Ctrl+, : reset playback volume
Shift+Up/Down or Shift+Mousewheel :
increase/decrease playback pitch 1 semitone
Ctrl+Shift+Up/Down or Ctrl+Shift+Mousewheel :
increase/decrease playback pitch 12 semitones
Ctrl+. : reset playback pitch
Ctrl+D : toggle script docked state
Ctrl+Shift+D : toggle undocked split-view
Ctrl+E : focus arrange window
Alt+Click or Ctrl+F : add selected result to
favorites
Ctrl+H : hide selected result (will sort to
bottom of future searches and not be used in multi-layer
mode)
Shift+Space : play/stop selected result
Enter : insert result(s) or run multi-layer
mode
Ctrl+Enter or Ctrl+Drag: insert result(s) and
render with fx through preview track
Ctrl+Shift+Enter or Ctrl+Shift+Drag: insert
result(s) and render with fx through preview track (only one
region)
nvk_RECORD

With the script docked (right-click below title bar), you can click on the waveform preview window when you have no items select to enable nvk_RECORD. This adds a jsfx to your Monitoring FX Chain which allows you to have a buffer of the last 20 seconds of output from Reaper. Right-click and drag in order to make a selection and the click-drag to bring that recording into your project. You can also click-hold to preview and click-drag outside the selection area to move the recording buffer area around. Zoom in and out with the mousewheel in order to find the section you are looking for.
nvk_CREATE - Replace
This script allows you to quickly swap out items for other items randomly using the search and multi-mode settings of your choice. To use the script, simply select the items you want to replace and run the script. The search string and the settings used will be determined in priority in the following order from highest to lowest priority:
This means you can type a search in the track containing the item and quickly swap it out for a new item matching that search. You can also add multi-layer settings for randomization by using the following format:
<search string> l<length number> p<pitch number> r<reverse percentage number> (-r) (-t) (-n)
Example 1: ice crunch l6 p12 r50
Search the last
used database for "ice crunch" with length of 6 seconds, pitched
randomly 12 semitones, reversing 50% of the items, randomizing
takes, trimming, and normalizing items.
Example 2: explosion l3 r100 -n
Search the last used
database for "explosion" with length of 3 seconds, reversing
100% of the items, no pitch randomization, randomizing takes,
trimming, no normalizing of items
Track Name Settings
l6 : length (6 seconds)
p6 : pitch (6 semitones)
r6 : reverse (6% chance)
-r : no randomization
-t : no trim
-n : no normalize
Known Issues
Changelog
- 1.8
- - Importing items now respects user setting for copying imported media items to project
- - Fix for not being able to change take offset in item peaks view if the take contained stretch markers
- - 1440p zoom option
- - Support for beta sws extension with more robust playback
- - Possible fix for item fades being affected by replace script
- - Replace no longer works on locked items
- - Greatly improved search speeds after first completed search
- - Fixed bug where adding a new item over an existing item would delete the existing item
- 1.7.3 Respect project setting for preserve pitch enabled on items, playback preview pdc now accounts for bypassed fx
- 1.7.2 Alt-drag from waveform view now only adds the selected variation
- 1.7.1 Fixed crash when cancelling apply track fx, improvements to search speed, fixed bug where zoom wasn't working whenusing spectral peaks, now you can zoom in and out in all waveform views, selection playback now loops if setting enabled
- 1.7
- - Zoom and preview selected item peaks. Mousewheel scroll now zooms in and out of item peaks preview and clicking outside the selection will preview. Shift-click will preview inside selection. While zoomed in, dragging the selectionto the corner will automatically scroll the window. Shift-scroll will move the view left or right when zoomed in
- - Alt double-click in item peaks window will move sound to the new region without changing the length or position ofthe item (keeping snap offset the same)
- - Old mousewheel behavior in item peaks can still be used by holding control (for now, might get rid of this since it's not that useful)
- - Improved performance with Soundminer and multi-layer mode as well as replace script
- - Fixed bug where take markers would still be created with replace script
- - Fixed bug where sometimes take markers wouldn't be removed from replaced items
- - Playback preview line now compensates for pdc when previewing through track
- - Ctrl/cmd when dragging retrospective record selection will now apply track fx
- - Behavior change when holding shift and dragging a sound into the project. If dragging a result, shift will override the auto-trim setting. If dragging a selection from the waveform view and holding control, shift will only process that specific area. Shift by itself shouldn't have any effect when dragging from waveform view for now.
- - Disable auto-naming of multi-layer tracks by Reaper
- 1.6.5 Fixed bug introduced in 1.6.4 if SWS not installed
- 1.6.4 Option to allow for empty searches with replace script, lock button to keep focus on playback peaks for retrospective recording, option to disable take markers/snap offsets
- 1.6.3 Option to focus arrange after mouse drag-drop
- 1.6.2 Adding option in config file to set fade in time and changing default fade in time from 0.01 to 0.001 for bettertransients
- 1.6.1 Minor bug fixes
- 1.6
- - Undocked split-view (new option): features of docked mode while not docked.
- - Docked split-view option removed, added option for split: disabled instead.
- - Hold shift when dragging or inserting item to override trim setting. If auto-trim is enabled, it will be disabled and vice-versa.
- - New keyboard shortcuts for docking/undocking, enable undocked split mode, and focus arrange window
- - Demo time would expire if attempted to input license key.
- - Improved licensing UX
- - Fix issue when dragging retrospective recording into project with 0 results found
- 1.5.2 Licensing Improvements
- 1.5.1
- -Fix issue with nvk_RECORD tutorial restarting
- -Turn on 'resolve Soundminer file paths' by default
- 1.5
- -nvk_RECORD (Retrospective Recording): Click on the playback preview mode to enable nvk_RECORD. When you don't have any items selected, you will be able to right-click-drag to make a selection and then click-drag to bring it into yourproject. You can also preview by clicking and holding down the mousebutton.
- -Soundminer Integration: nvk_CREATE now allows you to select Soundminer as a database. Simply install the latestversion of Soundminer and the Soundminer REAPER integration and then open the script. With Soundminer open, you will beable to search the current Soundminer database. You can also filter results with Soundminer and then bring them up innvk_CREATE by doing a blank search. Great for making a custom filter for multi-layer mode.
- -Colors: choose from a number of custom themes for your waveform or highlight colors or create your own by selecting'custom'. You can also now change themes/colors with F11/F12 and modifier keys.
- -Filters: You can now add filters to your search (channel count, sample rate, bit rate, file length, region length).For example, if you only wanted to find files that were above 48k, you could search for "growl 48k+" and it would only return files that match "growl" and are 48k or above. Improved functionality of NOT, OR, and "" searches. Now you can do things like: growl or roar tiger or leopard or lion not "sound ideas". You can also use the Soundminer format forsearches eg: "rock (heavy, metal, hard) -pop"
- -New options:
- -Waveform: Select waveform color.
- -Highlight: Select highlight color.
- -Split: you can now force a specific split orientation. Automatic will decide which orientation to use depending on the script window dimensions.
- -Particle effects: Enables particle effects on retrospective record playback line.
- -Preview pitch: Change the playback pitch when previewing sounds. Mostly there for hotkey reference since it gets reset every time you close and re-open the script.
- -Disable auto-search: script won't complete search until you press enter. Useful for very large Soundminer databaseswhere searching as you type might not be performant.
- -Show full file-path: results will display the full-file path instead of just the file name. You can also view thefull-file path without this option during playback in the tooltip area at the top of the script.
- -Save multi-layer state: when closing the script, if you have multi-layer mode open it will be open next time you open the script.
- -Retro waveforms: gives the waveforms a retro look and slightly reduces cpu use
- -Improvements/fixes:
- -7-day trial available now to test before purchasing the script
- -Better calculation of results to display after turning multi-layer mode on and off while docked.
- -Spacebar starts/stops timeline playback in more situations where it makes sense.
- -Waveform appearance improved (anti-aliased, fill to zero line)
- -Keyboard input now processed on same frame as graphics display (might slightly improve responsiveness)
- -Issue with editing selected items that had playrate other than 1
- -Fixed mouse cursor bugs when showing selected item peaks
- -Crash when running multi-layer mode without any matches
- -Display channel count, bit rate, and sample rate after file metadata
- -Fixed lag occuring when using pin to top icon
- -Various optimizations:
- -Improved load time of dbcache
- -Improved speed of peak generation in REAPER 6.43+, taking advantage of new multi-core peak generation.
- -Deferred functions close instantly when exiting script (if possible)
- -Removed unnecessary global variables.
- -Reduced draw calls.
- -Refactored peak analysis functions to improve responsiveness of script
- -Changes:
- -Removed result placeholders while docked option. Didn't seem that useful and was causing bugs.
- 1.1.2 Database selection now saves immediately to config instead of at script close so replace script can use new database immediately. Bug fixes.
- 1.1.1 Various bug fixes
- 1.1 Right-click drag to create time selections in waveforms (first pass on this feature, planning to improve). Variousbug fixes.
- 1.0.4 Fix for databases not being found due to incorrect REAPER.ini, crash when pressing F3 with no databases selected, default to not combining variations for new users, multi-layer now shows count of generated multi-layer variations in tooltips, can no longer favorite databases (it didn't work anyway), error when selecting empty item while script is docked
- 1.0.3 File names with quotes no longer break things 2: Electric Boogaloo
- 1.0.2 File names with quotes no longer break things
- 1.0.1 Bug fixes, licensing improvements
- 1.0 Initial Release